
- At First
- System Structure
- Arch Linux Installation Process
At First
I’ve been too busy with my personal life to update this site…
Anyway, quite some time has passed since SDXL was released and I have decided to migrate from the SD 1.5 environment because of the variety of ckpt and LORA. My GPU is a GeForce RTX 3060 12GB with minimal performance, so SDXL is considered to be a heavy burden. However, it would be shameful for me as a PC DIYer and Linux guy to give up so soon. I have tried to make SDXL lighter and faster by any means possible, so that it can run smoothly even with RTX 3060 12GB.
The first thing I did was to switch OSs. StableDiffusion runs on Windows and Mac, but it is slower than on Linux. I can compromise by building your environment on WSL -Windows Subsystem for Linux-, but in any case, AI masturbation QoL will be higher in the future if I tune up my AI in the native Linux environment. As a proud Japanese-Hentai-Boy (Hinomoto Onoko), it is natural for me to spare no pains and do my best to improve the quality of my daily Hentai-Masturbation.
Therefore, I’m going to crush my Windows gaming desktop PC also has been used for AI, and reincarnate it into an Arch Linux AI server. The followings are the images of a prototype with SDXL after the environment was built.


There are also the images of a Loli-Pregnant-Child in a school swimsuit used as an eye catcher at the end of the article, so go take a look.
System Structure
Hardware Structure
I will also note something about hardware. This is a DIY PC with almost all of its parts replaced with the almost latest products, but re-using the case/power-supply/fans/some SATA SSDs from a Haswell-machine I built 10 years ago. It was built last June 2023.
- CPU: AMD Ryzen 7 7700
- Cooler: AMD Wraith Prism (Retail)
- RAM: DDR5-5200 64GB CL42 / CFD W5U5200CS-32Gx2
- GPU: Nvidia GeForce RTX 3060 12GB / MSI GeForce-RTX-3060-VENTUS-2X-12G-OC
- SSD
- NVMe: Samsung 980 PRO with Heatsink 1TB (2023)
- SATA: Plextor PX-256M5Pro 256GB (2013)
- SATA: KIOXIA EXCERIA SSD-CK960S/N 960GB (2020)
- M/B: ASUS PRIME B650M-A-CSM
- Power: 760W / Seasonic Xseries SS-760XP2 Active PFC F3 (2013)
- Case: CORSAIR Obsidian Series 350D without acrylic panel (2013)
The reason for installing a lot of memory is to make effective use of Ramdisk. I mount the Linux standard temporary file system tmpfs as a Ramdisk and place the StableDiffusion itself there to speed up operation and reduce the number of writes to SSDs.
System Design
Before moving on to Arch Linux installation process, I should think about and define a system design that will allow Linux to be used most efficiently as an AI server.
- only CUI
- No GUI is used to maximize computing resources; no desktop environment such as Xorg/Wayland is installed.
- No physical display, keyboard, or other input/output devices are connected. iGPU (CPU built-in GPU), onboard audio, and unused USB ports are all disabled in the BIOS/UEFI to minimize power consumption.
- StableDiffusion is started with –Listen option and is controlled via a web browser from other terminals in my LAN.
- Utilizing tmpfs/Ramdisk
- Maximize the utilization of Linux’s standard temporary file system, tmpfs, as a ramdisk. StableDiffusion itself is placed on Ramdisk to maximize performance and minimize damage to the SSD.
- Since Ramdisk=RAM is volatile memory, it disappears when the power is turned off, so it is necessary to manually copy/paste from SSD to Ramdisk at each boot and manually back up from Ramdisk to SSD at each shutdown. Therefore, I’ll write a systemd service to automate these processes. Specifically, rsync command is used.
- Utilizing also as a Samba server
- AI products are output/stored on an internal SATA-SSD and shared within LAN using Samba.
- StableDiffusion with –Listen option can be operated on any device that can use a web browser, and combined with Samba sharing, allows AI generation and subsequent processing and editing to be performed on any Windows/Mac/Linux/iOS/Android device within LAN connection.
- Optimize Nvidia CUDA
- Nvidia CUDA in its initial state has multiple inefficiencies when operating as a GPGPU. For example… no support for suspend, very poor watt performance at initial (maximum) TDP, repeated driver loading/unloading during work processes such as AI generation… etc. Optimize these to maximize watt performance as an AI server.
After Arch Linux is installed, system implementation work is performed to satisfy each of the above 4 requirements.
Arch Linux Installation Process
Pre-Installation
Preparing Installation Image
Arch Linux installation is performed on the actual device from a USB live environment. You can download Arch iso-image of the installation media from your favorite mirror server. I got it from JAIST -Japan Advanced Institute of Science and Technology-.
JAIST: Arch Linux latest iso Repository: https://ftp.jaist.ac.jp/pub/Linux/ArchLinux/iso/latest/
The latest at this time is the June 1 edition. (archlinux-2024.06.01-x86_64.iso)
Arch Linux adopts a rolling-release model, meaning that there is no version number. The date on the iso image of the installation media only means “the latest version as of x month/y day”, and any date is acceptable unless it is too old.
After the download is complete, check the integrity of the iso image against the checksum. Although a very rare case, it is possible that a mirror server has been hijacked and its files have been tampered with by an unauthorized person. In a real case, the Linux Mint iso image was tampered with in February 2016.
“Beware of hacked ISOs if you downloaded Linux Mint on February 20th!”: https://blog.linuxmint.com/?p=2994
If you download from a https server instead of a http server, there is no danger to be concerned about, but you should be cautious. 7-Zip checksums are useful in Windows environments. In this case, I’ll check with SHA256.
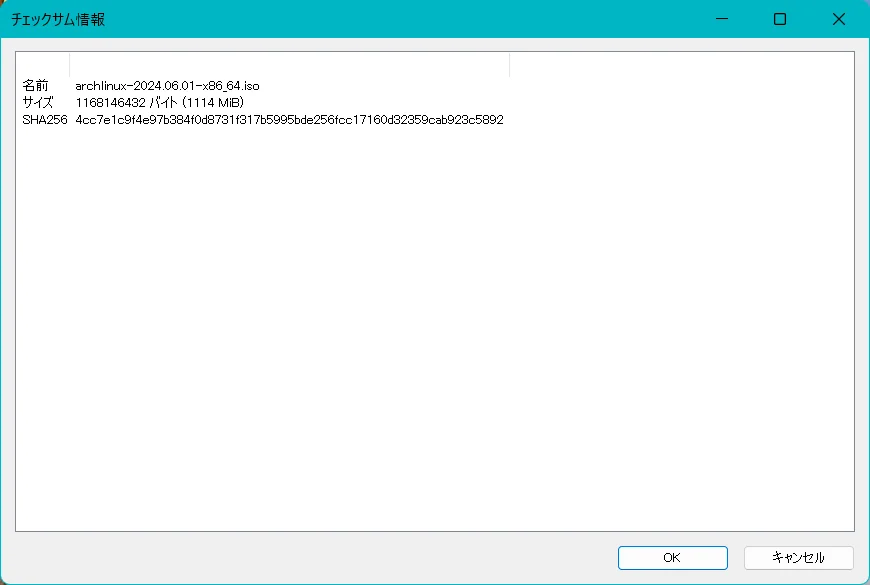
https://ftp.jaist.ac.jp/pub/Linux/ArchLinux/iso/latest/sha256sums.txt

4cc7e1c9f4e97b384f0d8731f317b5995bde256fcc17160d32359cab923c5892  archlinux-2024.06.01-x86_64.iso
4cc7e1c9f4e97b384f0d8731f317b5995bde256fcc17160d32359cab923c5892  archlinux-x86_64.iso
34616c90f015caec8e32243f5b8fd785bd07f333ec042b7ee3c985f12856239c  archlinux-bootstrap-2024.06.01-x86_64.tar.zst
34616c90f015caec8e32243f5b8fd785bd07f333ec042b7ee3c985f12856239c  archlinux-bootstrap-x86_64.tar.zst
The string “4cc7e1c9f4e97b384f0d8731f317b5995bde256fcc17160d32359cab923c5892” matches, so I can confirm that the iso image has not been tampered with. This is a relief.
Then, I can actually write the iso image to a USB flash drive to create bootable media. The method depends on OSs. You use Mac? Fuck off.
For Windows:
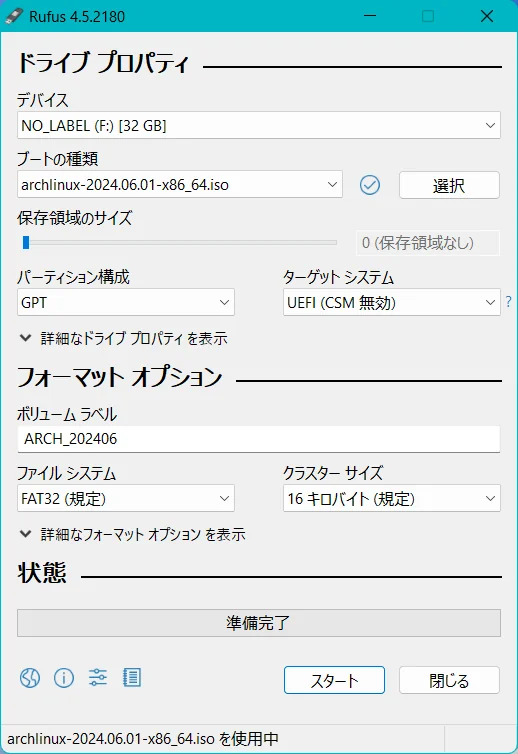
Rufus is a good choice. You can download it officially or from “窓の杜” (Mado no Mori=Windows Forest=Japanese Famous Free-ware site) or get it from the Microsoft Store, or you can use Winget.
Rufus Official: https://rufus.ie/
窓の杜: https://forest.watch.impress.co.jp/library/software/rufus/
Microsoft Store: https://apps.microsoft.com/detail/9pc3h3v7q9ch
If you use Winget, you can use Powershell on your Windows Terminal to↓
PS C:\Users\your_username> winget install Rufus.RufusOnce downloaded, run Rufus and burn it. Simply specify the path to your iso image and the drive letter of your USB flash drive as shown below, and then press “Start”.
For Linux:
Use dd command. To write the above archlinux-2024.06.01-x86_64.iso placed directly under your home directory into a USB stick at /dev/sdb:
# dd if=/home/your_username/archlinux-2024.06.01-x86_64.iso of=/dev/sdb bs=4M conv=fsync oflag=direct status=progressMake sure that the target USB stick is not mounted before executing dd command. Do not add a partition number; specify the path to the USB stick itself. In the above example, do not write “/dev/sdb” as “/dev/sdb1”.
This completes the preparation of the installation media. Let’s move on to the actual installation process.
Configuring UEFI/BIOS
The installation process is performed using USB live environment of Arch Linux, but UEFI settings must first be changed to enter in USB live environment. In addition, I will optimize UEFI for use my DIY PC as a Linux AI server. The UEFI pic used below as an example is for my motherboard, and may be different for other motherboards. UEFI version is latest in June 2024.
The date and time of some of the images are different because I forgot to take screenshots:D lol
M/B: ASUS PRIME B650M-A-CSM
UEFI: PRIME B650M-A BIOS 2613
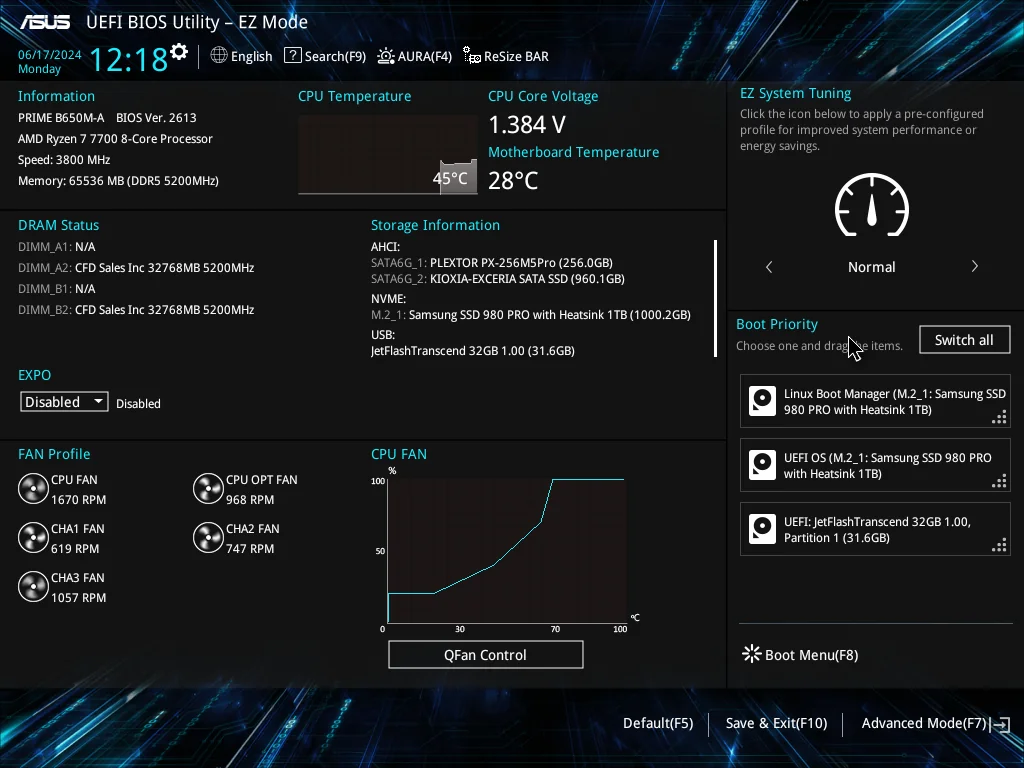
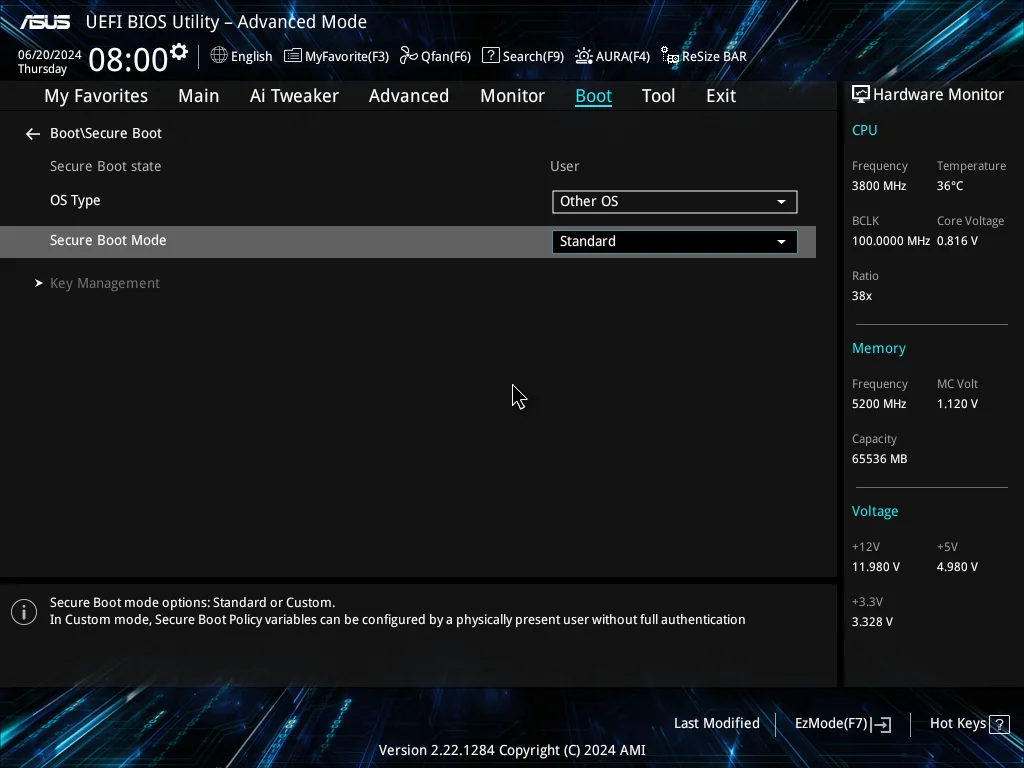
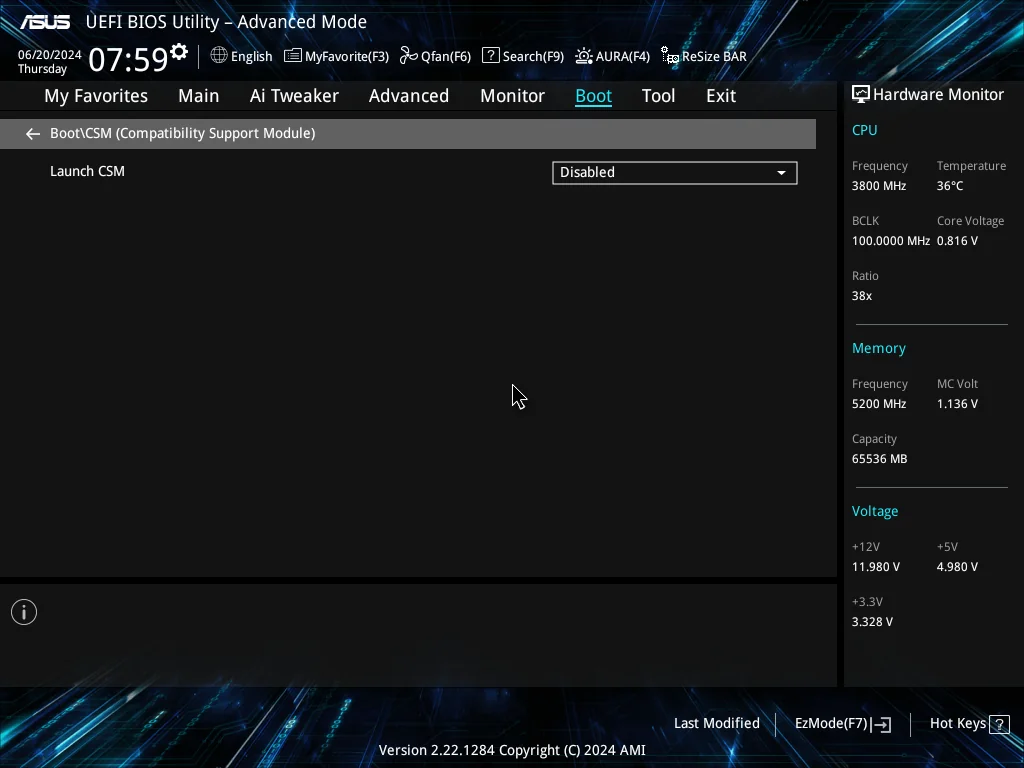
in Boot tag:
Secure Boot: Windows UEFI→Other OS
Launch CSM: Disabled
UEFI-only operation, so CSM is not needed. Disable it.
in Ai Tweaker tag: Auto Overclocking will be disabled & Curve Optimizer for power saving
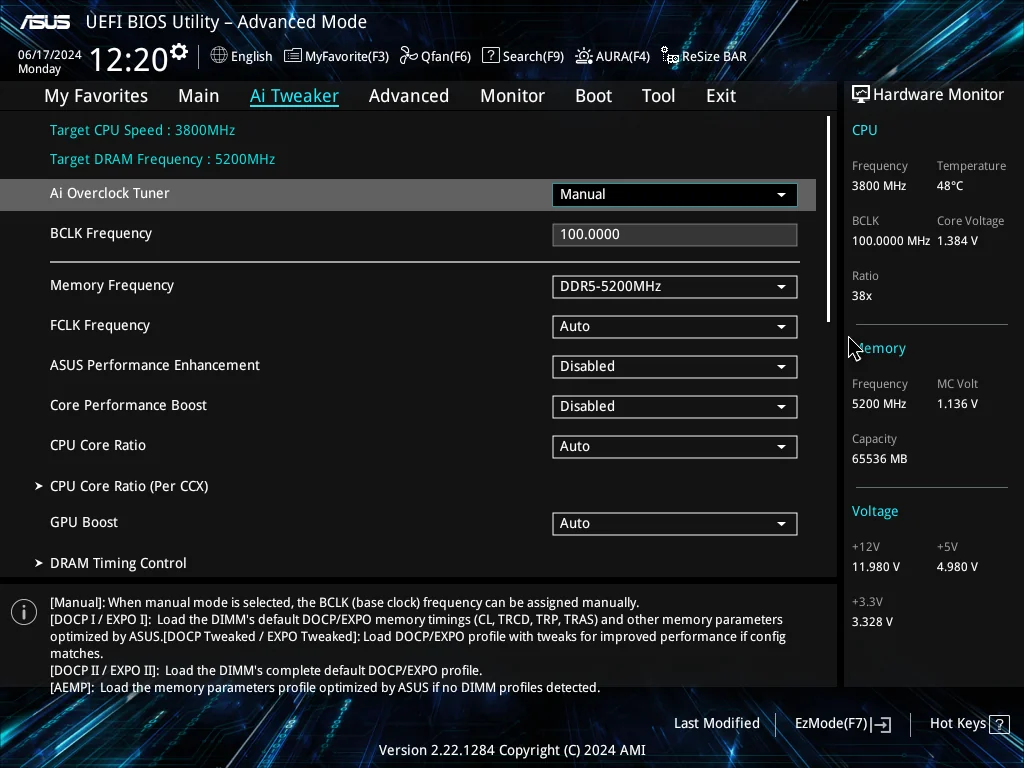
Current CPUs for desktop PCs, both Intel and AMD, are initially set to continue overclocking as long as the cooling performance of the CPU cooler allows. This is the kind of fire-playing that perverted overclockers used to do in ancient times to enjoy the thrill of being on the brink of burning out silicon. We, ordinary users, don’t need to go along with such excessive and abnormal performance competition, so we should disable the automatic overclocking setting and reduce power consumption. Electricity bills are getting higher, too:<
Ai Overclock Tuner: Manual
Memory Frequency: DDR5-5200MHz
Determine manually the operating frequency of RAM.
ASUS Performance Enhancement: Disabled
Disable automatic overclocking.
Core Performance Boost: Disabled
Disable automatic overclocking.
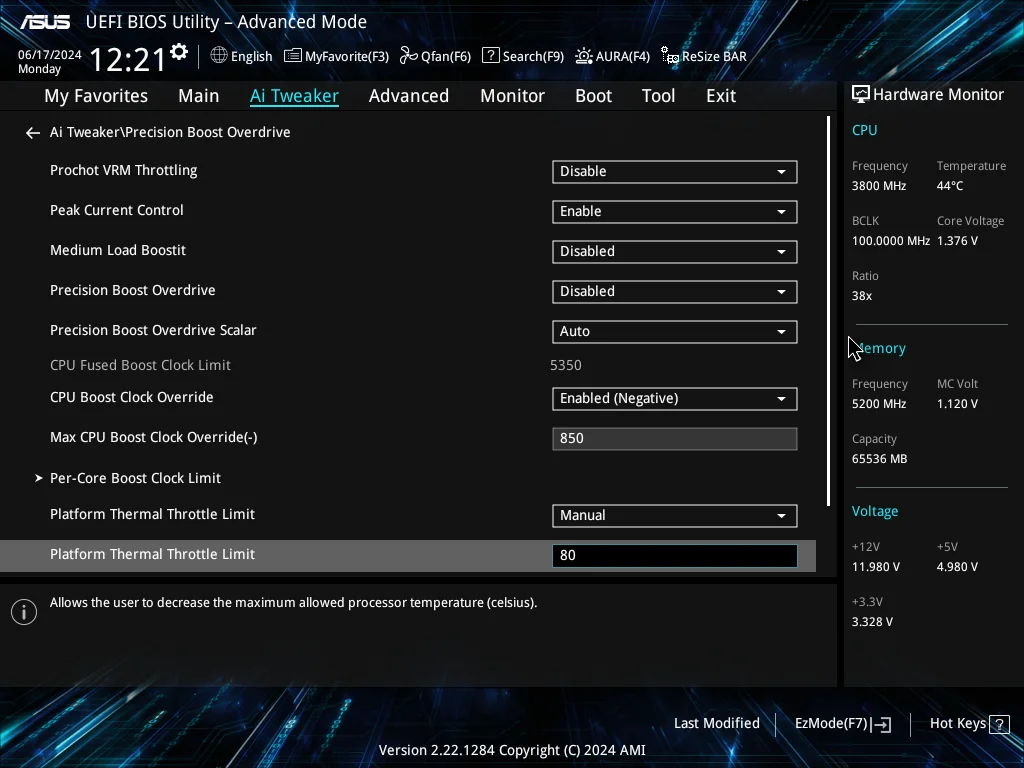
Prochot VRM Throttling: Disable
Peak Current Control: Enable
Medium Load Boostit: Disabled
Precision Boost Override: Disabled
Disable automatic overclocking.
CPU Boost Clock Override : Enabled (Negative) 850
This function increases or decreases the CPU clock frequency limit. Positive setting increases the upper limit, and negative setting decreases the upper limit. The initial upper limit of this individual CPU = Ryzen 7 7700 was 5.35GHz, but 850MHz is discounted and 4.5GHz is set as the upper limit.
Platform Thermal Throttle Limit: Manual 80
This function sets an upper limit to the operating temperature of the system. 80℃ is set as the upper limit.
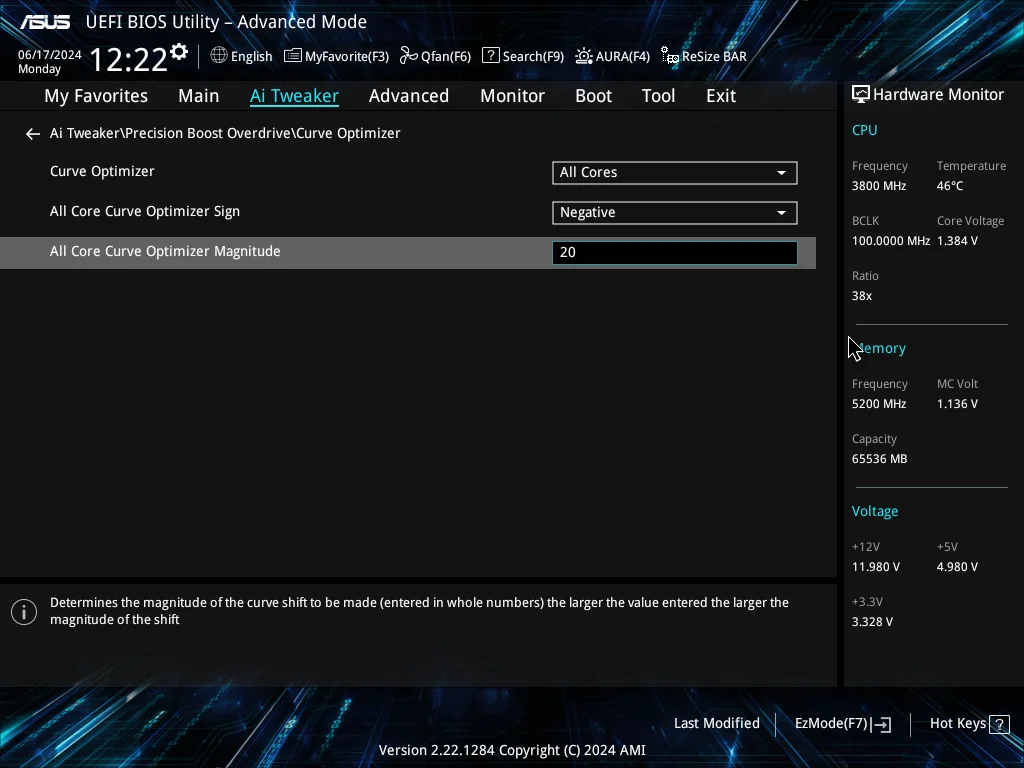
Enable Curve Optimizer: All Cores
Curve Optimizer is a function that adjusts the voltage fluctuation curve of the CPU. CPU drive voltage fluctuates in proportion to clock frequency. This function raises or lowers this voltage fluctuation curve by a fixed width to operate the CPU with the desired characteristics.
Generally, the adjustment is made in the direction of lowering the voltage fluctuation curve. This is because the lower the voltage fluctuation curve, the less heat the CPU emits, allowing it to operate at higher clock frequency. This function is originally used to increase the frequency boost during overclocking, but this time it is used for power saving. As mentioned above, disabling the automatic overclocking setting and limiting the boost clock to 4.5 GHz with the “CPU Boost Clock Override” setting and lowering the voltage fluctuation curve will save power consumption and reduce heat generation.
It is possible to adjust each core one by one, but this is troublesome, so all cores are controlled together as “All Cores”.
All Core Curve Optimizer Sign: Negative
Setting in the positive direction raises the voltage fluctuation curve by a uniform width, while setting in the negative direction lowers it by a uniform width.
All Core Curve Optimizer Magnitude: 20
Curve Optimizer can be set from +30 to -30 points. The lower limit of the safe range is -20 points, below which there is an increased risk of OS or application crashes. Since the safe zone changes depending on the individual differences of CPUs, it may be possible to refine the setting with more examination, but since it is troublesome, I will keep it at -20 points.
in Advanced tag: Disable iGPU and unused onboard devices
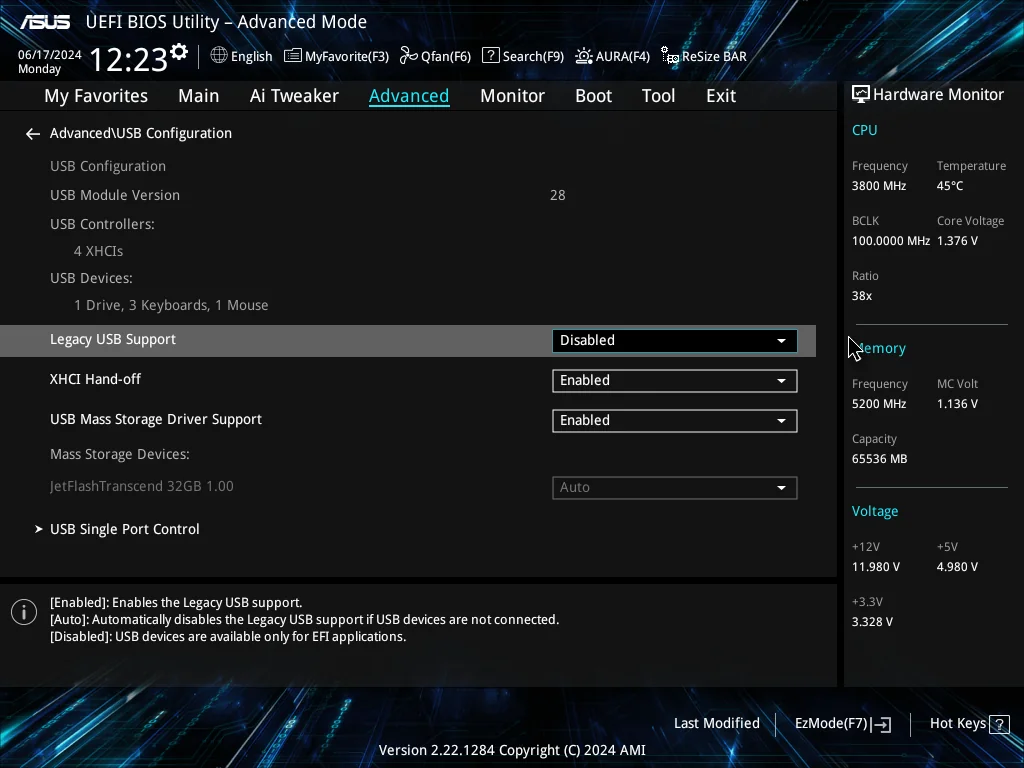
USB Configuration:
Legacy USB Support: Disabled
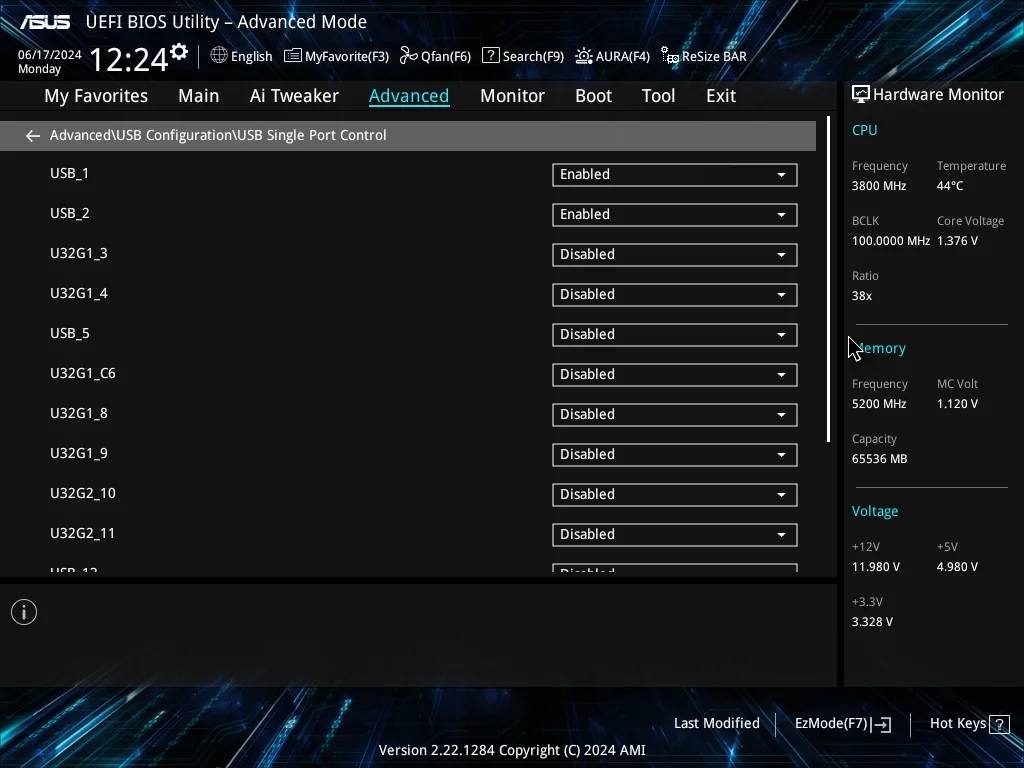
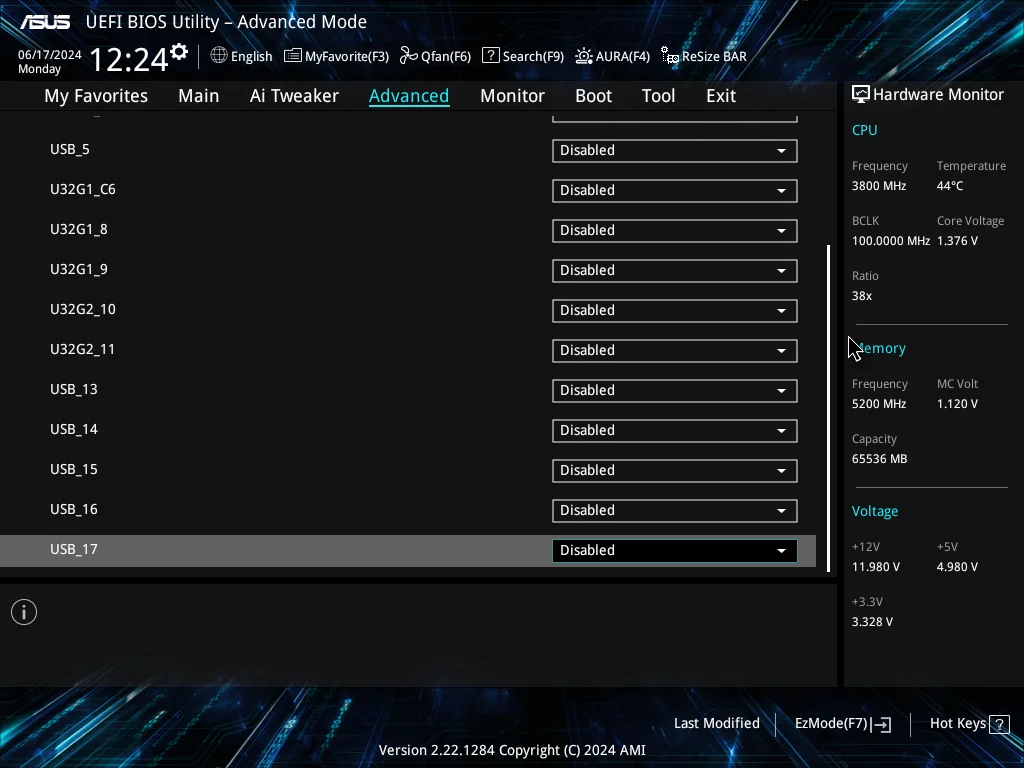
USB Single Port Control:
Disables all USB ports except ports #1 and #2 for connecting keyboard, mouse, and bootable media. Reduces power consumption.
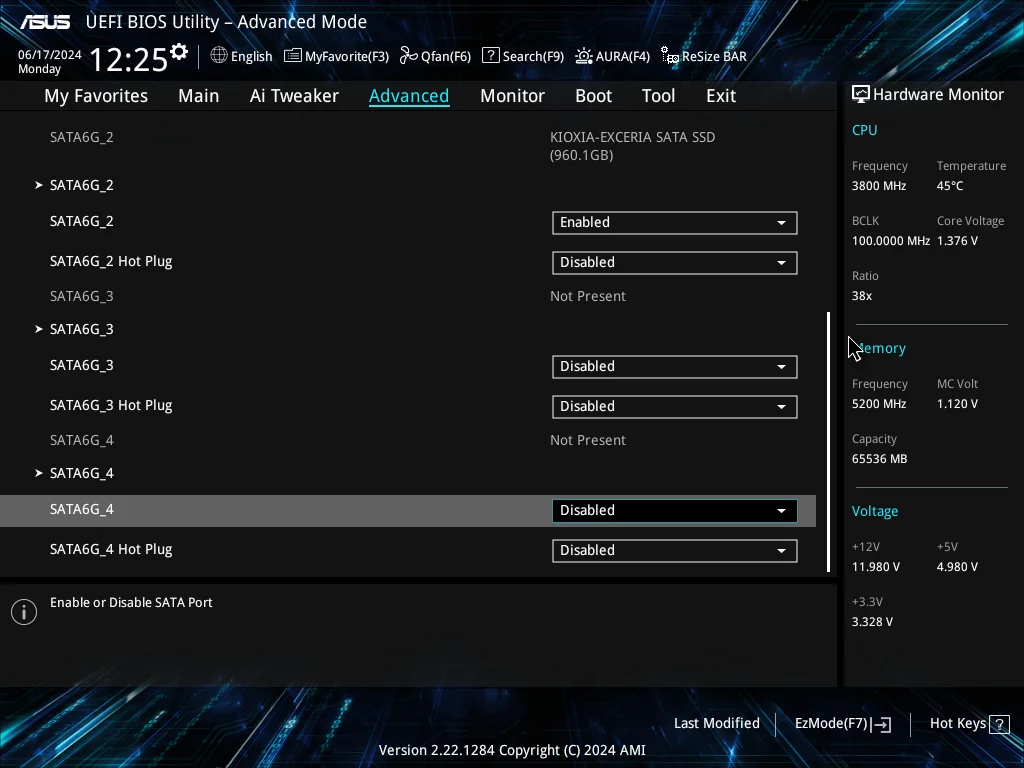
SATA: Disable unused SATA ports #3 and #4.
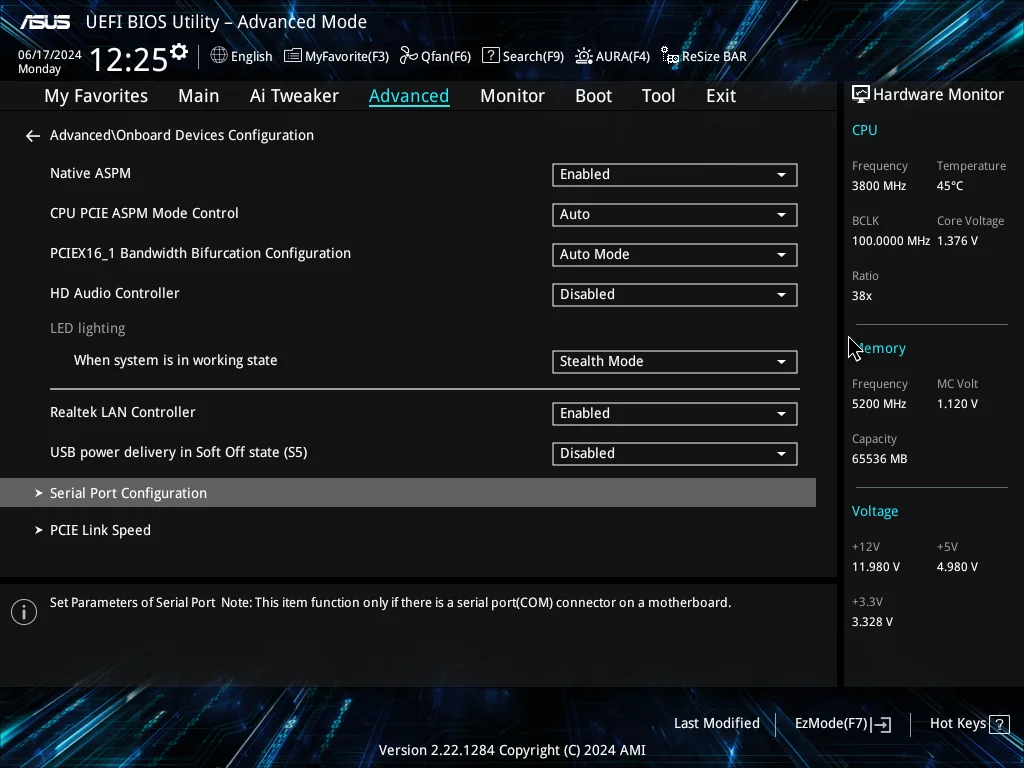
Onboard Devices Configuration:
Native ASPM: Enabled
HD Audio Controller: Disabled
Disable On-board Audio.
When system is in working state: Stealth Mode
Disable all On-board LED.
USB power delivery in Soft Off state (S5): Disabled
Disable USB PD.
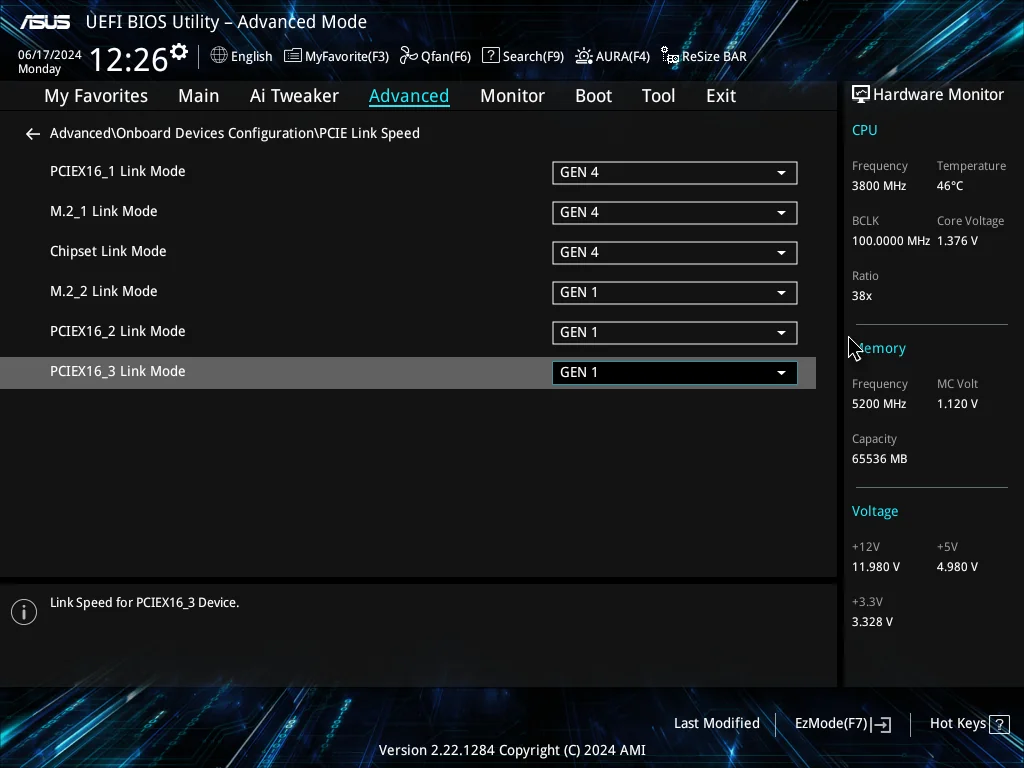
PCIE Link Speed:
Set the generation of unused PCI Express ports to gen 1. Match the generation of the port to be used with that of the connected device.
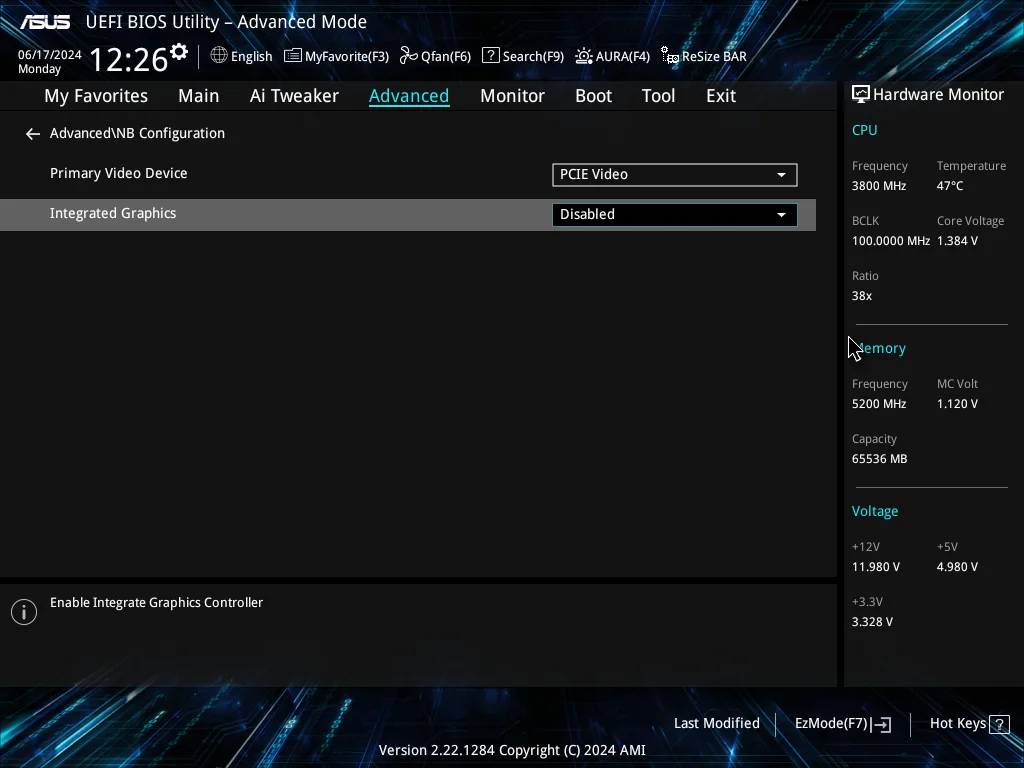
NB Configuration:
Primary Video Device: PCIE video
Integrated Graphics: Disabled
Disable iGPU (CPU built-in GPU). Connect the video cable to the dGPU (graphics-board) only during initial installation and when UEFI settings need to be changed, otherwise leave the video cable disconnected to allow the graphics board to concentrate on AI processing.
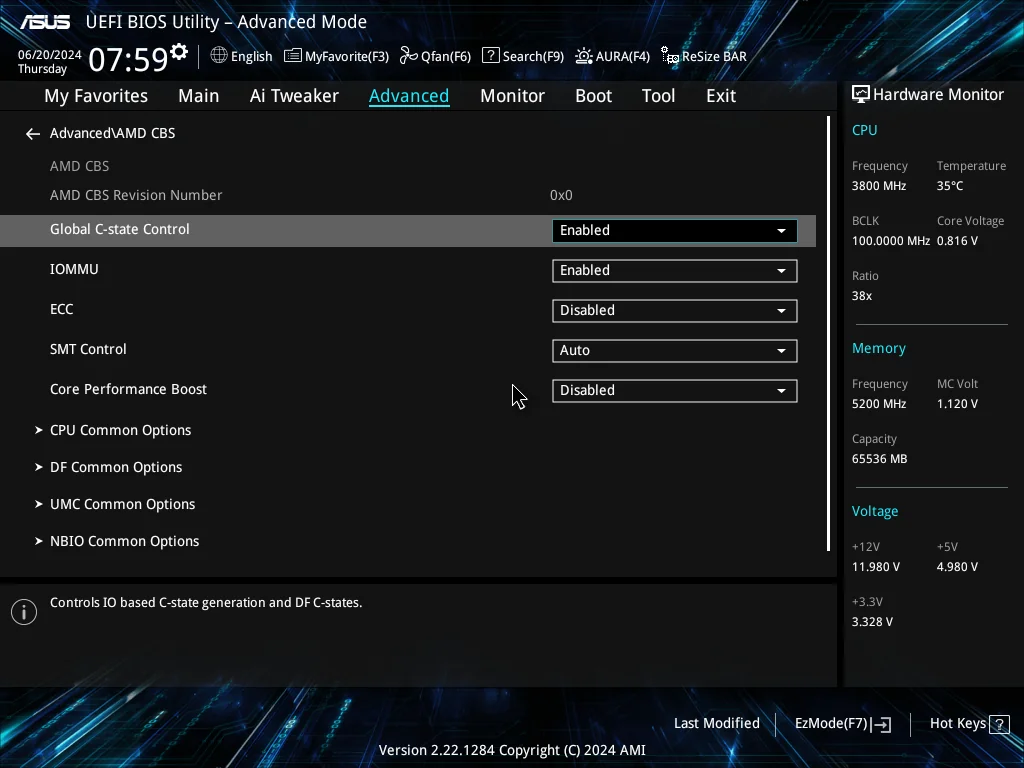
AMD CBS:
Global C-state Control: Enabled
ECC: Disabled
ECC is a memory error correction feature used in commercial servers, etc. The RAM in this PC is non-ECC memory, so it is (explicitly) disabled.
Core Performance Boost: Disabled
AMD automatic overclocking setting. Disable it.
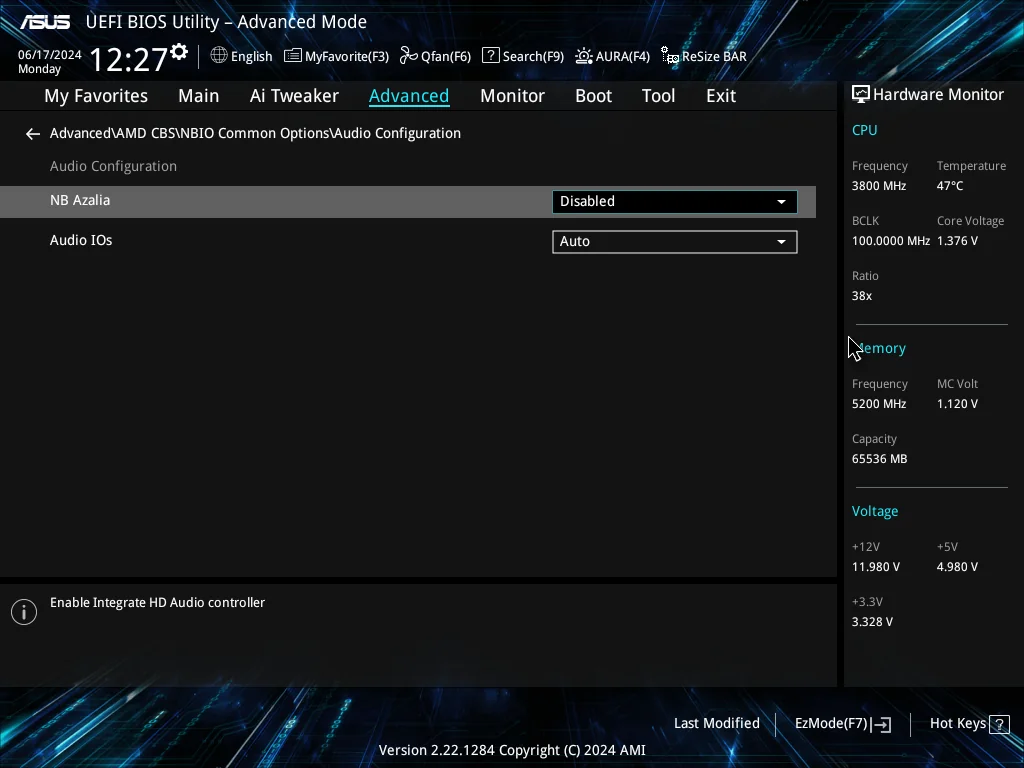
NBIO Common Options/Audio Configuration:
NB Azalia: Disabled
Disable On-board Audio controllers.
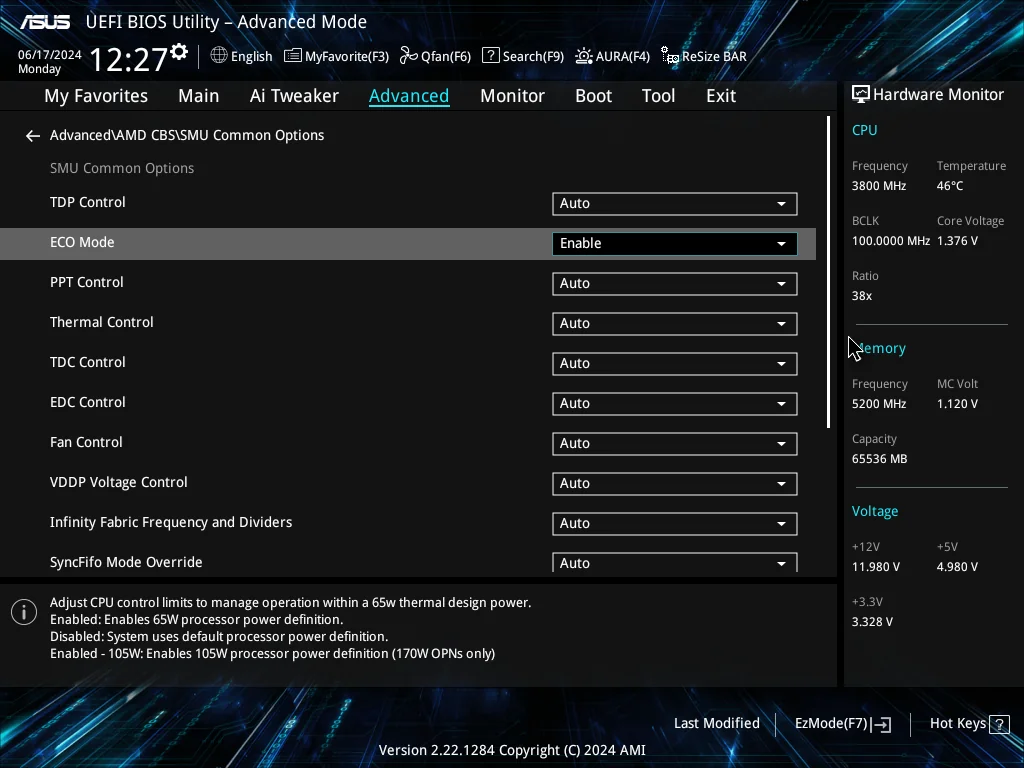
SMU Common Options:
ECO Mode: Enable
Check if power-saving settings are functioning
BIOS/UEFI configuration is now complete. Save the settings and reboot to see if they are functioning as expected.
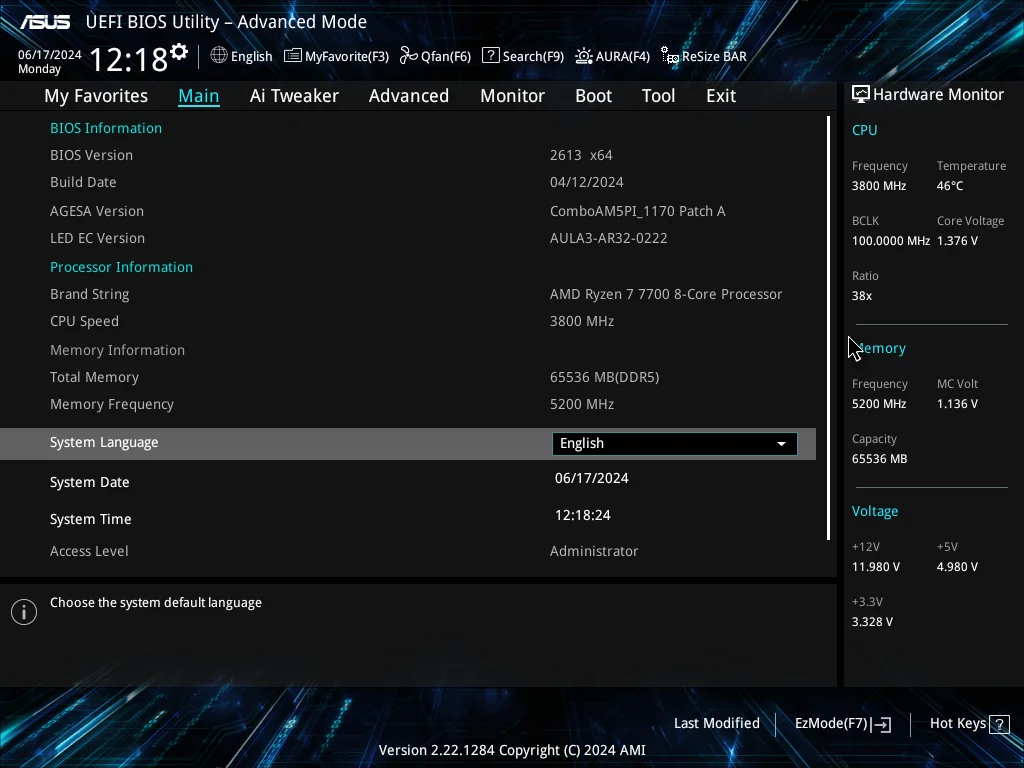
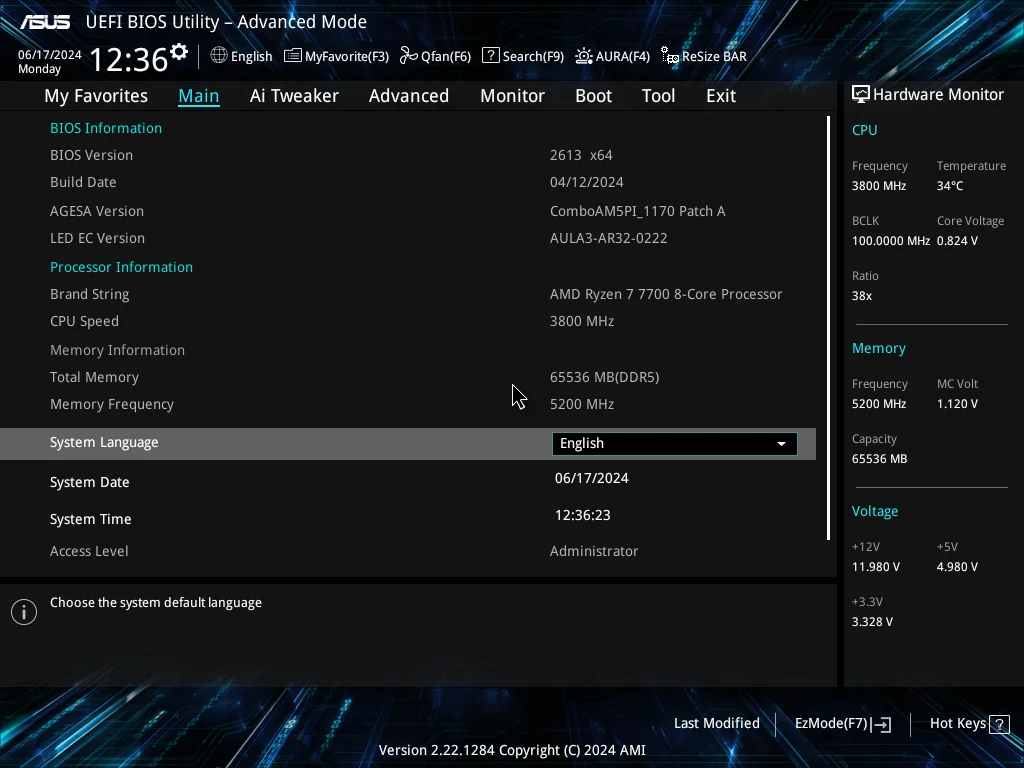
The pics above and below show a comparison of the main screen immediately after UEFI startup, before and after power-saving settings. CPU core voltage in idle state has decreased by 0.552V and CPU core temperature has decreased by 12℃.
Once confirmed, turn off the power. Then insert the bootable media and keyboard to a live USB port and turn on the power to start the USB live environment for Arch Linux installation.
Refresh SSD with Secure Erase
Before installing Arch Linux, refresh the memory cells of the internal SSD with Secure Erase. This is not necessary if the SSD is brand-new one, but if you are reusing a previously used SSD, erasing the memory cells will restore read/write speed. This work will be done in the USB Live environment of Arch Linux.
For SATA SSDs
Use the “hdparm” command. First, check the information to see if the drive supports Secure Erase. Below is an example of my Plextor PX-256M5Pro 256GB (2013) connected to the motherboard of my DIY PC.
# hdparm -I /dev/sdaThe information on the drive is quite detailed, but what I should check this time is the “Security” section.
Security:
                supported
        not     enabled
        not     locked
                frozen
        not     expired: security count
                supported: enhanced erase
        6min for SECURITY ERASE UNIT. 6min for ENHANCED SECURITY ERASE UNIT.
Logical Unit WWN Device Identifier: 0000000000000000
        NAA             : 0
        IEEE OUI        : 000000
        Unique ID       : 000000000
The “supported: enhanced erase” indicates that this SSD supports Secure Erase and its enhanced version, Secure Erase Enhanced. I will run Secure Erase Enhanced anyway. To issue the Secure Erase command, “frozen” must be changed to “not frozen” and “not enabled” must be changed to “enabled” in the above parameters. The way to change the frozen state is easy, just suspend the PC once.
# systemctl suspendPress any key on the keyboard to release suspend, and the SSD should be “not frozen”.
To change “not enabled” to “enabled”, set a password for the drive and enable security. The password can be anything, as it is temporary. In this case, I chose my favorite thing in the world = child-vagina.
# hdparm --user-master u --security-set-pass child-vagina /dev/sdaThen I rerun “hdparm -I” command after going through the above process, the following state appears.
Security:
                supported
                enabled
        not     locked
        not     frozen
        not     expired: security count
                supported: enhanced erase
        6min for SECURITY ERASE UNIT. 6min for ENHANCED SECURITY ERASE UNIT.
Logical Unit WWN Device Identifier: 0000000000000000
        NAA             : 0
        IEEE OUI        : 000000
        Unique ID       : 000000000
And now I’m ready to execute Secure Erase. Note that issuing the following command will completely erase the memory cells, making data recovery difficult even for CIA.
# hdparm --user-master u --security-erase-enhanced child-vagina /dev/sdaWhen Secure Erase completes, security should be disabled and the password should be removed. Run the “hdparm -I” command again, and if the following status appears, it was successful.
Security:
                supported
        not     enabled
        not     locked
        not     frozen
        not     expired: security count
                supported: enhanced erase
        6min for SECURITY ERASE UNIT. 6min for ENHANCED SECURITY ERASE UNIT.
Logical Unit WWN Device Identifier: 0000000000000000
        NAA             : 0
        IEEE OUI        : 000000
        Unique ID       : 000000000
Secure Erase for /dev/sda is now complete. Repeat the same process for all installed SATA SSDs.
For NVMe SSDs
First, I need to change the frozen state of the drive. The procedure is the same as for SATA SSDs, just suspend.
# systemctl suspendNext, check to see if the drive supports Secure Erase. Below is an example of a Samsung 980 PRO with Heatsink 1TB (2023) connected to the motherboard of my DIY PC.
# nvme id-ctrl /dev/nvme0 -H | grep -E 'Format |Crypto Erase|Sanitize'

  [1:1] : 0x1   Format NVM Supported
  [29:29] : 0   No-Deallocate After Sanitize bit in Sanitize command Supported
    [2:2] : 0   Overwrite Sanitize Operation Not Supported
    [1:1] : 0x1 Block Erase Sanitize Operation Supported
    [0:0] : 0x1 Crypto Erase Sanitize Operation Supported
  [3:3] : 0     Format NVM Broadcast NSID (FFFFFFFFh) Supported
  [2:2] : 0x1   Crypto Erase Supported as part of Secure Erase
  [1:1] : 0     Crypto Erase Applies to Single Namespace(s)
  [0:0] : 0x1   Format Applies to All Namespace(s)
  [3:3] : 0     Controller Copy Format 3h Not Supported
  [2:2] : 0     Controller Copy Format 2h Not Supported
  [1:1] : 0     Controller Copy Format 1h Not Supported
  [0:0] : 0     Controller Copy Format 0h Not Supported
This drive seems to support Secure Erase by “nvme-format” command and “nvme-sanitize” command. I’ll use the format command this time.
The format command is simpler and easier to use than hdparm used for SATA SSDs. However, there is something to consider before issuing a Secure Erase: the concept of “Namespace”, which is an unique feature of NVMe drives.
If I run “lsblk” command in a current state, the following state appears.
$ lsblk -o NAME,SIZE

NAME          SIZE
sda         238.5G
sdb         894.3G
nvme0n1     931.5G
The above “/dev/nvme0n1” is the target NVMe drive. At first glance, “n1” following “nvme0” looks like a partition number, but it is not, because the partition has not been created yet. The “n1” is due to a function called “Namespace”.
NVMe can separate the storage area and make the system recognize it as a separate drive. The dividing function is “Namespace”. Since the separation is done at the firmware layer, it is more independent than the commonly used partitioning and is closer to the root of hardwares (so-called low-level).
For example, if I add Namespace 2 to the Samsung 980 PRO with Heatsink 1TB (2023) and divide the capacity equally, it would look like this. I’m not going to actually try this because it would be too much trouble for me:(
$ lsblk -o NAME,SIZE

NAME          SIZE
sda         238.5G
sdb         894.3G
nvme0n1     465.8G
nvme0n2     465.8G
“nvme0” refers to the SSD-Controller’s recognized number by this system. The following “n1” and “n2” are the Namespace numbers. This means that the system recognizes them as “different SSDs connected to the same controller chip”. It seems that S.M.A.R.T information is also separate for each Namespace if the device supports it, I don’t know if the Samsung 980 PRO supports it or not.
With the above ideas about “Namespace” in mind, execute Secure Erase with the nvme-format command.
# nvme format /dev/nvme0 -n 1 -s 2The option “-n 1” in the above command refers to Namespace 1. It means “allocate all the space managed by controller nvme0 to a single Namespace 1”. The subsequent “-s 2” is an option for Secure Erase. This option is described in man nvme-format as follows:
$ man nvme-format

       -s <ses>, --ses=<ses>
           Secure Erase Settings: This field specifies whether a secure erase should be performed as part of the format
           and the type of the secure erase operation. The erase applies to all user data, regardless of location
           (e.g., within an exposed LBA, within a cache, within deallocated LBAs, etc). Defaults to 0.
           ┌───────┬──────────────────────────────────────────┐
           │ Value │ Definition                               │
           ├───────┼──────────────────────────────────────────┤
           │ 0     │ No secure erase operation requested      │
           ├───────┼──────────────────────────────────────────┤
           │ 1     │ User Data Erase: All user data shall be  │
           │       │ erased, contents of the user data after  │
           │       │ the erase is indeterminate (e.g., the    │
           │       │ user data may be zero filled, one        │
           │       │ filled, etc). The controller may perform │
           │       │ a cryptographic erase when a User Data   │
           │       │ Erase is requested if all user data is   │
           │       │ encrypted.                               │
           ├───────┼──────────────────────────────────────────┤
           │ 2     │ Cryptographic Erase: All user data shall │
           │       │ be erased cryptographically. This is     │
           │       │ accomplished by deleting the encryption  │
           │       │ key.                                     │
           ├───────┼──────────────────────────────────────────┤
           │ 3–7   │ Reserved                                 │
           └───────┴──────────────────────────────────────────┘
Use “-s 1” or “-s 2” to execute Secure Erase. “-s 1” erases user data only and will be 0-filled or 1-filled after erasing. “-s 2” is an encrypted erase, equivalent to the “# hdparm –user-master u –security-erase-enhanced” command I did in the SATA SSD section. I can try issuing “-s 2” first, and if it doesn’t work, issue “-s 1”.
Now completes SSDs memory cell refresh operation with Secure Erase.
Actual Installation Process
From here, follow the ArchWiki installation guide.
ArchWiki EN: https://wiki.archlinux.org/title/Installation_guide
ArchWiki JP: https://wiki.archlinux.jp/index.php/%E3%82%A4%E3%83%B3%E3%82%B9%E3%83%88%E3%83%BC%E3%83%AB%E3%82%AC%E3%82%A4%E3%83%89
Check status of live environment
After the USB live environment is activated, first check to see if it is operating properly.
Is the System booting in UEFI mode?
# ls /sys/firmware/efi/efivarsIf some information is displayed, the system has successfully booted in UEFI mode. If the Directory does not exist, the system has been booted in BIOS mode and the UEFI settings should be reviewed.
Is the System properly connected to the Internet?
In the Arch Linux USB Live environment, the services required for Internet access are running by default. In a typical configuration of wired LAN + DHCP, you should be able to connect to the Internet as long as a LAN cable is connected. For wireless LAN, see below.
ArchWiki iwd: https://wiki.archlinux.org/title/Iwd
Ping the appropriate server to make a final check that you are connected to the Internet.
$ ping google.comIf you get a response, the systehave a successful connection, use Ctrl+C to force the ping command to terminate.
Is the System-Clock accurate?
In Arch Linux USB live environment, systemd-timesyncd, which synchronizes the system clock, is running by default. Just check to see if it is working properly.
# timedatectl statusCreating Partitions and File Systems
The drives will be partitioned and formatted with the appropriate file system. The current drives structure is as follows:
$ lsblk

NAME        MAJ:MIN RM   SIZE RO TYPE MOUNTPOINTS
sda           8:0    0 238.5G  0 disk
sdb           8:16   0 894.3G  0 disk
nvme0n1     259:0    0 931.5G  0 disk
Apply the system drive to NVMe SSD and install OS. Other remaining SATA SSDs will be treated as data storages and mounted under the Home-Directory. The final partition structure is as follows:
NAME        MAJ:MIN RM   SIZE RO TYPE MOUNTPOINTS
sda           8:0    0 238.5G  0 disk
└─sda1        8:1    0 238.5G  0 part /home/your_username/plextor
sdb           8:16   0 894.3G  0 disk
└─sdb1        8:17   0 894.3G  0 part /home/your_username/kioxia
nvme0n1     259:0    0 931.5G  0 disk
├─nvme0n1p1 259:1    0   512M  0 part /boot
└─nvme0n1p2 259:2    0   931G  0 part /
Partitioning
For partitioning, use the interactive tool “gdisk”, which is useful for partitioning GPT disks.
gdisk: https://wiki.archlinux.jp/index.php/GPT_fdisk
First, create an EFI system partition to put the boot-loader on NVMe SSD. The capacity is set to 512 MiB.
# gdisk /dev/nvme0n1

GPT fdisk (gdisk) version 1.0.10

Partition table scan:
  MBR: not present
  BSD: not present
  APM: not present
  GPT: not present

Creating new GPT entries in memory.

Command (? for help): n
Partition number (1-128, default 1):
First sector (34-1953525134, default = 2048) or {+-}size{KMGTP}:
Last sector (2048-1953525134, default = 1953525134) or {+-}size{KMGTP}: +512M
Hex code or GUID (L to show codes, Enter = 8300): ef00
Changed type of partition to 'EFI system partition'

Command (? for help): w
Since there is sufficient system memory, swap is not used. The remaining area will be treated as a Root-Directory, so I’ll create a partition with a common Linux file system.
Command (? for help): n
Partition number (2-128, default 2):
First sector (1050624-1953525134, default = 1050624) or {+-}size{KMGTP}:
Last sector (1050624-1953525134, default = 1953525134) or {+-}size{KMGTP}:
Hex code or GUID (L to show codes, Enter = 8300):
Changed type of partition to 'Linux filesystem'

Command (? for help): w
This completes the partitioning of /dev/nvme0n1. The same process is repeated for the remaining SATA SSDs, which are treated as a single partition of pure data storage, so the commands are simple.
# gdisk /dev/sda

Command (? for help): n
Partition number (1-128, default 1):
First sector (34-500117503, default = 2048) or {+-}size{KMGTP}:
Last sector (2048-500117503, default = 500117503) or {+-}size{KMGTP}:
Hex code or GUID (L to show codes, Enter = 8300):
Changed type of partition to 'Linux filesystem'

Command (? for help): w
# gdisk /dev/sdb
Command (? for help): n
Partition number (1-128, default 1):
First sector (34-1875384319, default = 2048) or {+-}size{KMGTP}:
Last sector (2048-1875384319, default = 1875384319) or {+-}size{KMGTP}:
Hex code or GUID (L to show codes, Enter = 8300):
Changed type of partition to 'Linux filesystem'
Command (? for help): wFormatting Partitions
Only the EFI system partition is formatted with FAT32, the rest with Linux standard File-System, ext4.
# mkfs.fat -F 32 /dev/nvme0n1p1# mkfs.ext4 /dev/nvme0n1p2
# mkfs.ext4 /dev/sda1
# mkfs.ext4 /dev/sdb1Mounting the File-Systems
Mount the Root partition in the appropriate Directory.
# mount /dev/nvme0n1p2 /mntContinue to create and mount the Directory where the EFI system partition will be placed.
# mkdir /mnt/boot

# mount /dev/nvme0n1p1 /mnt/boot
Installing the System Core Packages
Select the best mirror server with “reflector”
Download and install the Linux-kernel and “base” package, the core of the system, plus typical firmware from the official repositories. But first, let’s review the reflector settings.
“reflector” is a Python script that sorts the mirror servers in the official repositories according to communication speed, protocol, nationality, etc. The sorted server list will be written to pacman’s mirror list /etc/pacman.d/mirrorlist. This is a very useful script as it significantly improves communication speed during package installation/upgrade.
The following commands were used during this installation:
# reflector --protocol https --country JP,TW,KR --sort rate --latest 10 --save /etc/pacman.d/mirrorlistThis is a reflector command with the option “Write 10 servers that communicate via SSL using the https protocol and are located in Japan, Taiwan, or South-Korea, sorted by fastest download rate and most recently updated, to the pacman mirror list. The mirror list obtained by this command is shown below.
################################################################################
################# Arch Linux mirrorlist generated by Reflector #################
################################################################################

# When:       2024-06-13 23:38:55 UTC
# From:       https://archlinux.org/mirrors/status/json/
# Retrieved:  2024-06-13 23:38:35 UTC
# Last Check: 2024-06-13 23:34:44 UTC

Server = https://mirrors.cat.net/archlinux/$repo/os/$arch
Server = https://mirror.morgan.kr/archlinux/$repo/os/$arch
Server = https://mirror.twds.com.tw/archlinux/$repo/os/$arch
Server = https://ftp.lanet.kr/pub/archlinux/$repo/os/$arch
Server = https://archlinux.cs.nycu.edu.tw/$repo/os/$arch
Server = https://mirror.archlinux.tw/ArchLinux/$repo/os/$arch
Server = https://www.miraa.jp/archlinux/$repo/os/$arch
Server = https://free.nchc.org.tw/arch/$repo/os/$arch
Server = https://ftp.jaist.ac.jp/pub/Linux/ArchLinux/$repo/os/$arch
As for “reflector”, I’ll set it up to run automatically on a regular basis after system installation, but for now it can wait until later.
Run “pacstrap” command
Download and install the system-core-package with “pacstrap” command.
# pacstrap -K /mnt base linux linux-firmwareIn addition to the system-core-package, there is a text editor and other minimally required packages, which are installed with the pacman command after entering the system with chroot.
Initial System Settings
Generating fstab
It may be unnecessary to explain, but “fstab” is a file that configures which drive is mounted in which Directory at startup. It should be generated with at least the minimum necessary description.
# genfstab -U /mnt >> /mnt/etc/fstabMove into chroot environment
Enter the installed system with chroot.
# arch-chroot /mntFrom this point forward, the initial setup is done under the chroot environment.
Time Zone Settings
Set the time zone. In countries like the U.S.A, where there is regional time differences between East-Side and West-Side, this should be taken into account. However, in Japan, there is no regional time difference and all regions are UTC+9, so there is no need to take this into account. Region/City should be set Asia/Tokyo.
# ln -sf /usr/share/zoneinfo/Asia/Tokyo /etc/localtimeAnd Generate hardware-clock.
# hwclock --systohcInstall the minimum required packages
Install a text editor as it is required for further work. Also, install the other minimum required packages.
# pacman -S vim man-db man-pages texinfoIf you want to run only on wired LAN, this is not necessary, but if you want to run only on wifi, please install the package related to wireless control.Otherwise, you will not be able to do anything after leaving the live USB environment and rebooting. However, even if it happens, you can start the Live USB environment again. Chroot and install the other required packages.
Locale
Set the locale, generate JP and US locales, and set the language and time to JP locale. Of course, the character encoding is UTF-8. First, uncomment “en_US.UTF-8 UTF-8” and “ja_JP.UTF-8 UTF-8” in locale.gen.
# vim /etc/locale.gen

--------

#en_SG.UTF-8 UTF-8
#en_SG ISO-8859-1
en_US.UTF-8 UTF-8
#en_US ISO-8859-1
#en_ZA.UTF-8 UTF-8

--------

#iu_CA UTF-8
#ja_JP.EUC-JP EUC-JP
ja_JP.UTF-8 UTF-8
#ka_GE.UTF-8 UTF-8
#ka_GE GEORGIAN-PS

--------
Generate JP and US locales
# locale-gen

Generating locales...
  en_US.UTF-8... done
  ja_JP.UTF-8... done
Generation complete.
Set the LANG environment variable to set the system-wide locale for language, time, etc.
# vim /etc/locale.conf

LANG=ja_JP.UTF-8
Name the Hostname
Set up a Hostname and give the server a name. You can use any name you like, but do not use a long name. I’ll use my favorite thing in the world:”child.vagina” as an example. By the way, the actual Hostname I named is different, because I’m a security-conscious pedophile:)
# vim /etc/hostname

child.vagina
Now the name of this server is “Child’s-Pussy Server”. Fantastic Hentai Ecchi.
Root password
Set a superuser password. Ideally, the password should be as long as possible, yet easy to remember and insane. For example, it should be “I wanna impregnate elementary schoolgirls!” Of course, the actual pass is different.
# passwd

(example)
i_wanna_impregnate_elementary_schoolgirls!
Boot Loader
Select and create the Bloot Loader to be used. Since this server is a simple system environment with GPT disks and only a UEFI environment, I chose “systemd-boot”, which is the most generic and does not require any extra packages.
First, install “systemd-boot” on the EFI system partition.
# bootctl installWrite the Boot Loader configuration. Note that the Loader configuration file does not accept Tab for indentation, so be sure to use Space.
# vim /boot/loader/loader.conf

default arch.conf
timeout 4
console-mode keep
editor no
Continue to write the contents of “arch.conf” specified by the Loader, but some preliminary preparations are required.
First, let’s work on the CPU-Microcode. Microcode is the Instruction Set (ISA) updates and bug fixes for the CPU and must be loaded by an early-loader that runs before the OS boots. Install the microcode package.
# pacman -S amd-ucodeAs mentioned above, the CPU installed in this machine is AMD Ryzen 7 7700, so I installed AMD’s Microcode, but if you have an Intel CPU, please install the “intel-ucode” package.
Next, check the PARTUUID of the Root-Directory.
# blkid

/dev/nvme0n1p1: UUID="5F52-44F1" BLOCK_SIZE="512" TYPE="vfat" PARTLABEL="EFI system partition" PARTUUID="1c3f69ef-2bb8-4eae-b25c-1b5b18797d9b"
/dev/nvme0n1p2: UUID="72b49c91-509c-4fe1-9a6b-dbd16be10d83" BLOCK_SIZE="4096" TYPE="ext4" PARTLABEL="Linux filesystem" PARTUUID="b7f6a3ab-8265-49c5-a6ea-31fa20b67a31"
/dev/sdb1: UUID="756f2a24-13a5-43ee-b6c2-e4980a93e8ce" BLOCK_SIZE="4096" TYPE="ext4" PARTLABEL="Linux filesystem" PARTUUID="49c94eba-832e-43f4-96c1-addf0e408799"
/dev/sda1: UUID="afc50575-e4ab-4dae-accf-c8761fe1be7e" BLOCK_SIZE="4096" TYPE="ext4" PARTLABEL="Linux filesystem" PARTUUID="5df79103-bf49-4196-8aef-5b74180bea8f"
Make a note of “PARTUUID=b7f6a3ab-8265-49c5-a6ea-31fa20b67a31 in /dev/nvme0np2” or take a picture with your smart-phone. You will need it for the next step.
Now that the preliminary preparations are complete, write the contents of “arch.conf” as specified by the Loader.
# vim /boot/loader/entries/arch.conf

title Arch Linux
linux /vmlinuz-linux
initrd /amd-ucode.img
initrd /initramfs-linux.img
options root=PARTUUID=b7f6a3ab-8265-49c5-a6ea-31fa20b67a31 rw
The description “initrd /amd-ucode.img” is the Microcode configuration. The next line “initrd/initramfs-linux.img” is the initial RAM disk setup, but the early-loading of Microcode must be done before this. Therefore, it is written first.
The description after “options” specifies the Root-Directory, but to avoid problems, PARTUUID is used.If you specify “/dev/nvme0n1p2”, which is a common drive name, it will work. But if the drive name is changed for some reason, such as replacing the drive, it will not be bootable. Since the PARTUUID is persistent and does not change regardless of whether the drive is replaced, it is preferable to specify it using this description method.
This completes the initial setup of the system and leaves the chroot environment.
# exitAnd now completes the entire installation process of the Arch Linux system. Shut down the system once.
# shutdown nowAfter the power is turned off, unplug the USB stick from the Arch Linux installation media and press the power button to reboot. If the installation process up to this point is correct, the Arch Linux system built on the SSD will boot. In case of failure, do not panic and do not make a fuss, but re-insert the installation media and do the modification from the USB live environment.
That’s all for this time. I’ll write the article of system configuration after the installation completed next time.


July 07, 2024
Pissman in a Bathtub (in EN) = お風呂でオシッコマン (in JP)